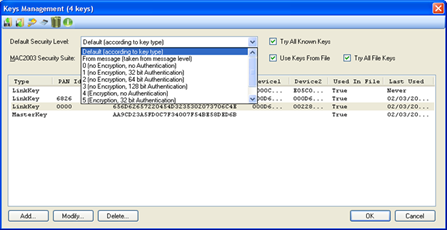
Is used for managing Security Keys and monitoring their usage within the current data analysis:

Figure 254 – Default Security Level options
•Network Keys may be imported or exported to a delimited file (.CSV) using
the export and import to .CSV icons respectively (
 ), allowing to easily editing
them with an external tool (e.g. Excel) and for keeping keys backup
•Swap
Key Bytes  - The ‘Swap Key Bytes’ icon (
 ) is used to
reverse the Key bytes order (e.g. the following Key
'000102030405060708090A0B0C0D0E0F' changes to '
0F0E0D0C0B0A09080706050403020100').
Swapping the key bytes is
accomplished by selecting the desired key line and pressing on the ‘Swap Key
Bytes’ icon ( ):
):
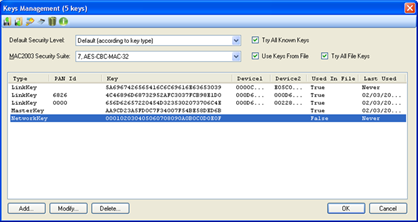
Figure 255 – Swaping Key Bytes
•Smart
Energy Calculator  - The ‘Smart Energy Calculator’ icon
(
 ) allows calculating the initial Link Key
for SE device based on its installation code.
After pressing the ‘Smart
Energy Calculator’ icon ( ), the hash calculator window opens.
When
entering a valid Installation Code, the Smart Energy HASH result is
automatically calculated and shown in the SE Hash field and can be copied and
pasted to the Key section in the 'Key Editing' form (see par.16.2.3).
If the installation code includes CRC, ('With CRC' should be selected), the user should enter the installation code including the CRC (so he can make sure he typed it correctly) and the Perytons™ Protocol Analyzer will show a warning notification if the CRC is incorrect. If the installation code does not include CRC, ('With CRC' should not be selected), the Perytons™ Protocol Analyzer will calculate it automatically:
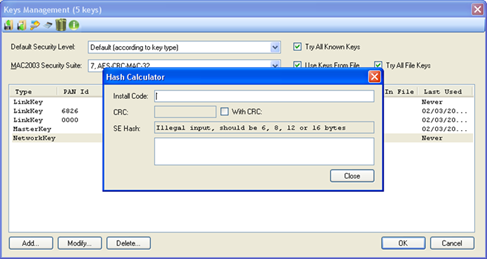
Figure 256 – Smart Energy Hash Calculator
Note: This option is only available if the ZigBee Smart Energy profile support is included in the user license.
•Delete
Unused Keys -  – remove all the keys that are not
used in the analyzed file from the Keys Form list
•Help - Open the Security help file in an additional windows (Internet connection is not required)
•Default Security Level - Security level. Can be either determined
according to the key type or set to one of the following
parameters:
Note: The user can force using the Default Key Level
regardless of the Key Level set individually for each encryption key. This is
accomplished by selecting the ‘Force Default Level’ checkbox (unless there is a
specific different need, having ‘Force Default Level’ checkbox selected is
recommended).
o Default (according to key type)
o From message (taken from message level)
o 0. (no encryption, no Authentication)
o 1. (no encryption, 32 bit Authentication)
o 2. (no encryption, 64 bit Authentication)
o 3. (no encryption, 128 bit Authentication)
o 4. (Encryption, no Authentication)
o 5. (Encryption, 32 bit Authentication)
o 6. (Encryption, 64 bit Authentication)
o 7. (Encryption, 128 bit Authentication)
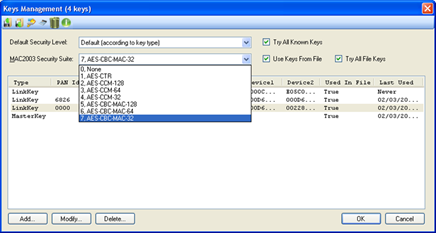
Figure 257 – MAC2003 Security Suite options
If using MAC2003-Security Suite encryption, the user can choose the deciphering algorithm to use from the drop-down list:
•0. None – Do not use the MAC-2003 Security Suite
•1. AES-CTR
•2. AES-CCM-128
•3. AES-CCM-64
•4. AES-CCM-32
•5. AES-CBC-MAC-128
•6. AES-CBC-MAC-64
•7. AES-CBC-MAC-32
Notes:
MAC2003 Security
Suite type can be set either through this form or through the User Preferences –
Processing Tab (See paragraph 19.8 for details). Setting through one of these
two methods is sufficient.
Unlike the plain Master key level (when MAC2003
Security Suite is set to '0. None'), levels 1 to 7 of the MAC2003 Security Key
are not included in the data capture (.ANL) file. In such case in order to
decipher the data of a given data capture file, the user needs to set the key
manually.
When choosing MAC2003 level '1. AES CTR', the 'Try All Keys' option
of the User Preferences – Processing Tab (see paragraph 19.8) is ignored.
44.2.1 Selecting Keys to process
Deciphering encrypted messages require high PC process resources. The following table describes the different available settings that allow optimizing the process time and resources when handling encrypted messages:
|
Try All File Keys Check this box in case keys are changing in the system so different keys may have similar parameters or in case you are not sure which key is relevant to which network/link. This will slightly increase the needed processing |
Try All Known Keys Check this box in case keys are changing in the system so different keys may have similar parameters or in case you are not sure which key is relevant to which network/link. This will increase the needed processing |
Use Keys From File Uncheck when you would like the analyzer to ignore keys that were added to the ANL file while deciphering this file during capture or during previous analysis |
|
|
|
|
|
The analyzer will try deciphering the messages using the relevant key (based on given field values like source and destination addresses, Pan address, etc.) located in the Keys Management list. The non-relevant keys in the data capture file will be cleared (so the new written .ANL file will not include 'old' non relevant keys) |
|
|
|
|
The analyzer will try deciphering the messages using ALL the keys included in the Keys Management list – relevant and non-relevant ones. The non-relevant keys in the data capture file will be cleared (so the new written .ANL file will not include 'old' non relevant keys) |
|
|
|
|
The analyzer will try deciphering the messages using the relevant key (based on given field values like source and destination addresses, Pan address, etc.) located in the data capture file (.ANL) and the Keys Management list. All the keys in the data capture file (relevant and non relevant ones) will remain in the file for future use |
|
|
|
|
The analyzer will try deciphering the messages using ALL the keys included in the data capture file (.ANL). All the keys in the data capture file (relevant and non relevant ones) will remain in the file for future use |
|
|
|
|
The analyzer will try deciphering the messages using ALL the keys included in the Keys Management list – relevant and non-relevant ones. All the keys in the data capture file (relevant and non relevant ones) will remain in the file for future use |
|
|
|
|
The analyzer will try deciphering the messages using ALL the keys included in the data capture file (.ANL) and from the Keys Management list. All the keys in the data capture file (relevant and non relevant ones) will remain in the file for future use |
|
All other combinations |
Not used | ||
Table 2 – Security Settings
Note: Keys
processing settings can be set either through this form or through the User
Preferences – Processing Tab (See paragraph 19.8 for details). Setting through one of these
two methods is sufficient.
The Analyzer Processing Load icon in the Main
Window Toolbar indicates whether the current settings imply a high consumption
of PC resources ( and
and  for high and normal PC
resources consumption respectively).When relevant, its tooltip suggests the
actions to take to lower PC resources consumption.
Clicking on any of the column headers sorts the table according to the chosen field (in ascending or descending order when clicking on the header for a second time) and columns widths can be adjusted as desired.
Note: Double clicking on the column edge will automatically fit the column width to the longest value content.
The Keys Management table includes the following columns:
•Type – describes the key type as defined either manually by the user (see following paragraph) or automatically when receiving it on-the-fly from the data traffic received. Optional values are:
o MasterKey
o NetworkKey
o LinkKey
o RF4CELinkKey
o MACNetworkKey
o GreenPowerKey
•PAN ID – a hexadecimal number representing the short PAN address (present only if relevant, captured on-the-fly or entered when the user defines it along with the key – see following paragraph).
•Key – a 16 byte hexadecimal number representing the encryption key (captured on-the-fly or entered when the user defines it along with the key – see following paragraph).
•Device1 – an 8 byte hexadecimal value (MSB first) representing the long MAC address of the source device (present only if relevant, captured on-the-fly or entered when the user defines it along with the key – see following paragraph).
•Device2 - An 8 byte hexadecimal value (MSB first) representing the long MAC address of the destination device (present only if relevant, captured on-the-fly or entered when the user defines it along with the key – see following paragraph).
•Used In File - A read only field showing if the key has been used in this file ('True') or not ('False'). All keys used to decode the messages will be also kept within the .ANL file.
•Last Used - A read only field showing when this key was last used (date and time). The time shown is based on the captured message timestamp and not on the time the analysis has been made.
44.2.3 Adding Modifying and Deleting Keys
Selecting a Key line/s and pressing 'Delete' removes the selected lines from the Keys Management Form:
Note: Pressing the Help icon in the form toolbar opens the security help file in an additional windows (Internet connection is not required)
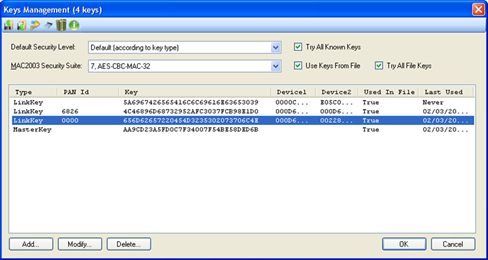
Figure 258 – Selecting Encryption Keys
Pressing 'Add' opens the Key Editing Form (similarly if a single Key line is selected, pressing 'Modify' or double-clicking on it will open the Key Editing Form as well):
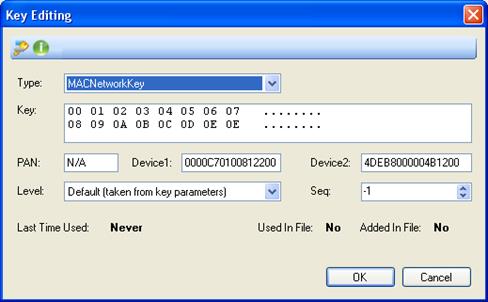
Figure 259 – Key Edditing form
The ‘Swap Key Bytes’ icon ( ) is used to
reverse the Key bytes order (e.g. the following Key
'000102030405060708090A0B0C0D0E0F' changes to '
0F0E0D0C0B0A09080706050403020100').
Swapping the key bytes is
accomplished by selecting the desired key line and pressing on the ‘Swap Key
Bytes’ icon ( ).
).
A security key can be copied from an
external string and pasted into the Key Editing form, Key section. The 'source'
key should be an hexadecimal string (e.g. 00112233445566778899aabbccddeeff, 0x
00 11 22 33 44 55 66 77 88 99 AA BB CC DD EE FF, etc.). The pasted key will be
automatically translated to ASCII and shown in this form on the form 'Key'
section right-hand side.
Pasting the key to the Key Editing form is done by
pressing Ctrl-V.
The Help icon opens the Security help file in an additional windows (Internet connection is not required)
•Type: - choose the key type to include in the list from the dropdown list
o MasterKey
o NetworkKey
o LinkKey
o RF4CELinkKey
o MACNetworkKey
o GreenPowerKey
According to the key type chosen, some additional fields should be entered.
•Key: - insert the key to include into the list either in hexadecimal
format (16 bytes) - on the left hand side of the section - or in ASCII format
(16 characters) – on the right hand side of the section (non ASCII values will
be presented as dots ".").
When inserting a key value different than 16 bytes
into the key section, the 'OK', button will remain not active:
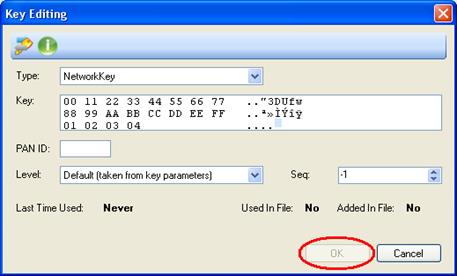
Figure 260 – Key not equal to 16 bytes
Deleting a byte or bytes is accomplished by selecting it/them with the mouse (either in the hexadecimal or ASCII sections) and pressing the 'Delete' key.
•PAN: - If available, insert the Network PAN Id key to include into the
list in hexadecimal format (4 bytes).
Notes:
The PAN
option appears only when relevant key types are selected.
When not available
this field will show 'N/A' (Not Available)
•Device1: - If available, insert the 8 byte hexadecimal value (MSB first)
representing the long MAC address of the source device using this
key.
Notes:
The Device1 option appears only when relevant
key types are selected.
When not available this field will show 'N/A' (Not
Available)
•Device2: - If available, insert the 8 byte hexadecimal value (MSB first)
representing the long MAC address of the destination device using this
key.
Notes:
The Device2 option appears only when relevant
key types are selected.
When not available this field will show 'N/A' (Not
Available)
•Level: - choose the security level to use for this key from the dropdown list:
o Default (according to key type)
o From message (taken from message level)
o 0. (no encryption, no Authentication)
o 1. (no encryption, 32 bit Authentication)
o 2. (no encryption, 64 bit Authentication)
o 3. (no encryption, 128 bit Authentication)
o 4. (Encryption, no Authentication)
o 5. (Encryption, 32 bit Authentication)
o 6. (Encryption, 64 bit Authentication)
o 7. (Encryption, 128 bit Authentication)
•Seq: - If available, insert the sequence number to use for this key
decimal format (value range is from -1 to
255).
Notes:
The Seq option appears only when relevant
key types are selected.
A value of -1 (Null) should be used when entering
this field is not relevant
•Last Time Used: - Non editable field.
Shows the date and time of when
the key was used last. 'Never' means this key has never been used to deciphered
messages.
•Used In File: - Non editable field.
Shows whether the Key was or
wasn't used ('True' and 'False' respectively), for deciphering messages in the
current file.
•Added In File: - Non editable field.
Shows whether the Key was or
wasn't added ('Yes' and 'No' respectively) to the data capture file (see par. 16.1).