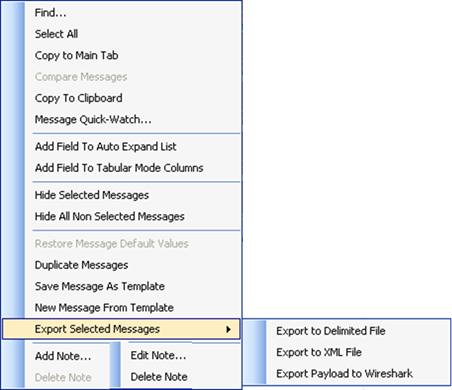
When pointing on a message and right-clicking with the mouse on it, the following options appear:

Figure 140 – Right clicking on a Message
Note: When
analyzing 6LoWPAN and ZigBee IP messages (using the LoWPAN plugin), additional
message options appear in the submenu when right-clicking on the messages ('Find
other TCP Segments', 'Follow TCP Stream', 'Follow HTTP Session') and more
sophisticated features are available to make analysis easier.
See VI.6 for
details.
Search for data in selected
messages
Note: When right-clicking on a specific field name (e.g.
MacHeaderFrametype) and choosing Find, the search form will open and the
originated field will be placed automatically in the 'Search in Field' location
in the form. See more info in chapter 14.
•Select all
Select all messages in the current Message View tab
•Copy to Main Tab (appears only when selecting a message which is not
already in the main tab)
Copy the selected message to the Message View main
tab
•Compare Messages
Compare properties of two messages selected in the current Message View Tab. This option is enabled only when two messages are selected. Compare results are shown in the message compare tab. See more info in par. 4.3.24.
Copy selected messages from current Message View tab to the clipboard with their current expand/collapse status. This is useful when printing messages' properties, or to use with a different program for purposes like problem report, e-mail message, etc.
•Message Quick-Watch…
Open the message structure in a temporary small Message View graphic mode type window – all fields are expanded. This window is closed when clicking with the mouse out of it anywhere on the screen. This feature is especially useful when right-clicking on a selected message when displayed in table mode.
•Add Field To Auto Expand List (see also par. 4.3.15)
Pointing the mouse on a specific field in the selected message, right-clicking and choosing this option, will automatically add the specific field into the Auto Expand fields list (will take place for future messages copied into the Message View window)
•Add Field To Tabular Mode Columns (appears only when in graphic
mode)
Pointing the mouse on a specific field in the selected message,
right-clicking and choosing this option, will automatically add the specific
field as a column when in tabular mode
•Hide Selected Messages
Hide the selected messages
from the current Message View active tab (the messages are also hidden from the
Time View window). See par. 1.3 for indication on hidden
elements.
Notes:
The user can unhide the relevant messages that were hidden at Message View by right clicking on the vertical axis of Time View or on an empty place in the Network View and choosing Unhide All.
There is no 'history' when hiding selected or unselected messages in Message View. i.e. if the user selects some messages and decides to temporary hide them from the Message View, the relevant messages will also be hidden from the Time View. However choosing on 'Unhide All' in the Time or Network Views will NOT unhide the messages back in the Message View tabs.
•Hide All Non Selected Messages
Hide the non-selected messages from the current Message View active tab (the message is also hidden from the Time View window). See 'Hide Selected Messages' above.
•Add Note…, Edit Note…, Delete Note
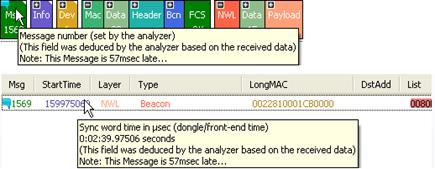
Allows adding, editing and deleting user defined message notes of any selected message. The message containing a user note will be marked respectively (the marking can be seen when the specific message is selected in Time, Message and/or Message Tree View windows):

Figure 141 – Message Note editing window

Figure 142 – Message User-Note Indicator (Graphical and Table modes)
Note: When the message note is deleted from a message, the message note indication disappears