 sign in the left top corner) the field
will be expanded and its 'sons' displayed.
sign in the left top corner) the field
will be expanded and its 'sons' displayed.In addition, the 'Expand' icon
 in the toolbar allows expanding all
fields of the selected messages.
in the toolbar allows expanding all
fields of the selected messages.When double clicking on an
expandable field (which has a sign in the left top corner) the field
will be expanded and its 'sons' displayed.
In addition, the 'Expand' icon
in the toolbar allows expanding all
fields of the selected messages.
32.3.14 Collapse
When double clicking on an
expanded field (which has a  sign in the left top corner) the field
sons will disappear, leaving the parent field with a small + sign.
sign in the left top corner) the field
sons will disappear, leaving the parent field with a small + sign.
In
addition, the collapse all icon  in the toolbar will
'minimize' all sub fields of the selected messages:
in the toolbar will
'minimize' all sub fields of the selected messages:

Figure 152 – Expanded vs. Collapsed Messages
32.3.15 Auto Expand 
The Auto Expand option allows defining a list of fields that will be automatically expanded by the analyzer whenever a message/s is added to the Message View main tab (either by a Script, by auto-add from Time View, or by manually dragging it/them to the Message View window).
The field selection form allows managing the list of fields that will be automatically expanded (see also par. 4.1).

Figure 153 – Auto Expand field selection form
32.3.16 Sort
up/down  /
/
Messages can be sorted
according to the message number, start time, source ID or PAN
ID.
Note: In Table View mode (paragraph 4.2) the user can sort the data by any
of the fields (by just clicking on the column name).

Figure 154 – Message sorting
32.3.17 Move Up/Down  /
/
The user can change the
order in which messages are displayed in Message View window. Pressing the up
arrow  will move the selected message one row
upwards, pressing the down arrow will move the selected message one row
downwards.
will move the selected message one row
upwards, pressing the down arrow will move the selected message one row
downwards.
32.3.18 Delete 
Remove the selected messages from the current Message View tab (messages are still kept in the data capture record file).
32.3.19 Auto sync 
Allows easy tracing of
messages between the Message View and other views. If this option is chosen,
clicking on a message in the Time View window (if the message was copied to this
tab and is therefore marked with  in Time View), or
clicking an arrow in the Message Sequence View, will bring this message into the
visual section of the Message View window and make this message selected (blue
background).
in Time View), or
clicking an arrow in the Message Sequence View, will bring this message into the
visual section of the Message View window and make this message selected (blue
background).
When pointing on a tab title and right clicking the mouse, the current tab (Close), other tabs (Close All But This) or all tabs (Close All) can be closed.

Figure 155 – RightClicking on a tab title
Note: The Main tab cannot be closed:
During real time capture mode, messages can be automatically added to the Message View main tab or to any of the search results tab.
In this case the Message View scroll position will be constantly updated so that the last message added will be displayed.
The Freeze option allows disabling this 'auto scroll' and keeps the current message in the visible section of the window regardless of any new messages being added to the relevant tab.
32.3.22 Choosing visual fields
By using a Script, the user can choose the fields that will be visual in the Message View section and change their properties (such as color, text etc.). For example, for a simple scenario, some of the MAC fields might be irrelevant to the user, while others should be easily accessed.
This is done by using the SetupField method in scripts. This method is called when a field's structure is built (not per message).
Setting the 'field.visual' parameter to false will disable the field from the display.
Setting the 'field.space' parameter to true, will create a small spacing between this field and the previous field (no matter if this field is visible or not).
For a detailed description on how to use Scripts to affect Message fields, see paragraph V.2.9.
32.3.23 Search Result tabs

Figure 156 – The Search Result tab
Search and/or Enhanced Search results are displayed in a new Message View tab window (the Search Result tab). Similar to what has been described for the Message View Main tab, all operations (e.g. delete, sort, move up/down, select, compare) can be performed on these messages. Messages can be copied to the Main tab by selecting the 'Move to Main Tab' option when right clicking on a message.
When performing a Message View search by using the Find option in the Message View window, or by using the find icon in the Message View toolbar, the search is performed over messages in the active Message View tab. This allows 'nesting' of Find results.
Note: The order of the messages is kept.
During real time capture mode, the search results are updated automatically with messages meeting the search criteria, when new messages are added to the Time View or relevant Message View tab.
32.3.24 Message Compare Results tab
When selecting two messages in any window (Time View, Message View Main or Search Result tabs) and choosing the Compare Message option by right clicking on one of the messages, the messages will be compared and the comparison result will be shown in the Compare Results tab.

Figure 157 – Message Compare Results tab
Unlike a normal message that has two rows – header row with field description and field value/meaning row, each messages compare result has three rows: The first row is for field description, the second is for first message value, and the third row is for the second message value.
The comparison result is color coded: Green is for fields that had the same value in both the messages, red for fields that had a different value and orange (or dark yellow) for fields that were present only in one of the messages.
In text fields, the non matching parts of the strings will be marked with blue background.
Note: Several message selected 'pairs' can be compared concurrently. All Message compare results will be shown in the Compare Results tab. and kept in the Workspace when saved to a file (.WRK).
When hovering the mouse on the Msg section, a tooltip showing the time difference between the two messages (start to start, and tail to start) is displayed.
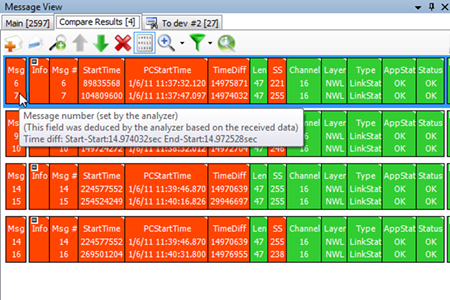
Figure 158 – Compare Results tab field's hint
