
When using a Peryton-Scripting Add-On on the Perytons™ Protocol Analyzer license, captured data can be saved to a centralized MySQL database (in parallel to being saved in a local capture file), allowing easy sharing of the captured data by additional Perytons™ Protocol Analyzer license owners from different locations either in real-time or from off-line captured data scenarios.
When the Peryton-Scripting Add-On is active the relevant tools and options for handling the database become available.
Note: The MySQL database should be reachable via IP protocol in order to be able to store data captured by the Perytons™ Protocol Analyzer into it.
49.20.1 Managing
your database 
In order to capture data into a database (in parallel to the data capture file that is saved in the local disk), a MySQL type database should be defined and created – MySQL is a widely popular and used open source database - http://www.mysql.com/.
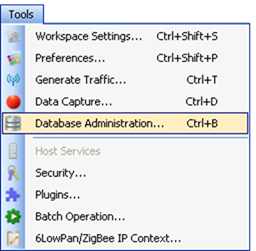
After creating and defining your MySQL database you can manage the Perytons™ Protocol Analyzer connection to it from 'Tools/Database Administration…' option:

Figure 370 – Managing connection to your MySQL database
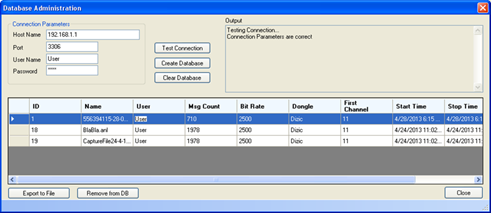
When choosing the 'Database Administration…' the Database Administration form opens:

Figure 371 – Database Administration from
The following steps need to be performed in order to prepare the MySQL database connection and storing of the data captured by the Perytons™ Protocol analyzer.
Define the Connection Parameters:
•Host Name – Definition of the IP address (or relevant DNS name) of the machine where the MySQL database resides.
•Port – Connecting port to approach the MySQL database in the host IP address (usually the default port is 3306)
•User Name – User name set to connect to the MySQL server
•Password – As set for accepting connection of the User Name (see previous field) to the MySQL database
If the Connections Parameters were
defined correctly, a relevant successful notification will be shown in the
Output window section after pressing the 'Test Connection'
button.
Notes:
Successful connection to the MySQL
database is obligatory in order to create the database required structure as
explained in the following paragraph.
If the database is located on a remote
computer you must make sure that a steady, high bandwidth, internet connection
to this computer is available and that the relevant firewalls are set to allow
this connection. The Perytons™ Protocol Analyzer will not take automatic care of
the database maintenance (such as automatic clearing old data, automatic removal
of old files from the database, etc.). It is expected that such database
maintenance will be taken care by the system administrator.
Create the database structure:
•Create Database – Pressing the 'Create Database' button creates the
required structure in the MySQL database that is required to store the data
captured by the Perytons™ Protocol Analyzer (the database created is named
'perytons').
Note: Creating the database is required only the first
time that a connection to the MySQL database is achieved.
If the 'Create
Database' button is pressed after the successful creation of the database
structure, a message stating that "the database already exists" will be
shown.
Clear the database structure:
•Clear Database – Pressing the 'Clear Database' button 'empties' the tables of the 'perytons' structure in the MySQL database that was created to store the data captured by the Perytons™ Protocol Analyzer. Note that this action is not reversible.
49.20.2 Managing specific data captures in the database
When selecting to save captured data to the database (see how this is done in the following paragraph), each captured data session is shown in a separate line in the Database Administration table.
Such information includes the following fields:
•ID – An identification unique number provided by the Perytons™ Protocol analyzer Application
•Name – The capture file name (.ANL)
•User – The username that saved this capture file to the database
•Msg Count – The number of messages included in the capture file
•Bit Rate – Data rate of the data in the capture file
•Dongle – Dongle type used for capturing the data
•First Channel – The first channel of the data included in the capture data file (in case of a single channel model, this value shows the channel captured)
•Start and Stop Time – Time and Date period of the capture
•Description - Capture file description as inserted when starting the capture session.
The following actions can be performed on a selected data capture file:
•Export to File – Export the data capture file from the MySQL database structure format to .ANL format
•Remove from DB – Remove the selected capture file from the database
•Close – Close the database administration form
49.20.3 Files in database – capturing and reading
After setting-up the database, the capture form will include active "Read Online from Database" and "Save to Database" options:

Figure 372 – Capturing to Database – Capture Form options
•Save to Database – When selected the capture session will be saved also to the database (this will be done in parallel of saving the capture session to the disk)
•Read Online from Database – When selected data saved to the database will be read in real-time to the application (this option performs a kind of data capture simulation mode but from the database data capture file – see par. IV.11.3.3):

Figure 373 – Selecting the file to read from Database
After selecting the "Read Online from Database" option, the 'Data File:' field section of the Capture form, includes a drop-down list of the files already saved to the database.
Selecting the desired files from the list will load its contents into the Perytons™ Protocol analyzer environment allowing its analysis in "simulation" mode.
Pressing the refresh button  on the
right and-side of the 'Data:' field refreshes the drop-down list with the latest
records of data capture files residing on the database.
49.20.4 Data capture file in database – off-line analysis
After setting-up the database, the New Workspace form will include active "From Database" option:

Figure 374 – Data Capture file from Database – Offline analysis
After selecting the "From Database" option, the 'Data:' field in the 'Input Files' section of the workspace form, includes a drop-down list of the files already saved to the database.
Selecting the desired files from the list will load its contents into the Perytons™ Protocol analyzer environment allowing its analysis.

Figure 375 – Data Capture file from Database – Choosing the file
Pressing the refresh button  on the
right and-side of the 'Data:' field refreshes the drop-down list with the latest
records of data capture files residing on the database.